Overview
This two part “Pano2VR” tutorial show you how to animate a multilevel Lower Third Banner that is responsive to mobile devices such as smartphones.
Note: this tutorial is designed for Pano2VR V6.1.2 You can download the software here.
Part 1 Final Output
Testing Links
If you would like to test the Part 1 Final Output in your browser you can use the link https://rebrand.ly/lower-third
Tutorial Files
In the tutorial folder, Responsive_Lower_Third, there is an Asset Folder with 5 .svg files and an equirectangular file ‘Shwe_Ba_Taung.jpg’. There is also a Project folder with a Pano2VR project 'lower_third.p2vr', a skin 'lower_third.ggsk' and an Output Folder called 'Lower_Third' with project files created from the .p2vr and .ggsk elements. (Figure #1)
Figure #1: Tutorial Folder
Project Overview
In this tutorial we will modify the lower_third.ggsk skin by;
Setting the Z-index of elements in the lower third to manage the stacking order
Adding Timers and configuring them to move/change elements in a sequence
Note: this tutorial assumes a basic knowledge of Pano2VR V6
Note: click on any image in the tutorial to enlarge it
Getting Started
1. Download the zipped tutorial folder here
2. Double Click on the project file ‘lower_third.p2vr’ to open it. (Figure #2)
Figure #2: lower_third.p2vr project w
3. Click on the ‘Open Output’ button to see the current state of the project (Figure #3 & 4)
Figure #3: Open Output button
Figure #4: Current state of the project
The Skin
1. Click on the ‘Edit Skin’ button to open the skin editor (Figures #5 & 6”)
Figure #5: Skin Editor button
Figure #6: lower_third skin
2. Click on the ‘Live Preview’ button to see the current skin with text rendering (Figures 7 & 8)
Figure #7: Live Preview button
Figure #8: Live Preview window with rendered text
Note: In this tutorial I am using Google Fonts, Barlow, for the text elements. For more information on using Google Fonts in Pano2VR projects check out my Google Fonts for Text Fields tutorial
Note: We can see in the preview that the lower third elements are not presented in the correct stacking order. The green bar should be inside the black ribbon and the shadow of the yellow panel should be behind the black ribbon. In the next step we will adjust the ‘Z-index’ of the elements.
Setting Z-index
Note: The stacking order in which skin elements appear are controlled by the Z-index option. When the Z-index is set to Default the stacking order is based on the position of the element in the Tree.
For example in the supplied skin the svg_green_stripe is at the bottom of the tree, in the Preview Window we can see that it is below all of the other elements. The current Z-index for the element is set to Default.If we want to set a particular stacking order then we can assign a number to the Z-index to override the elements physical location in the tree.
1. Select the svg_green_stripe element to make it active and set a Z-index of 30 (Figure #9)
Figure #9: svg_green_stripe element Z-index set to 30
2. Click on the ‘Live Preview’ button to see the current skin with Z-index update (Figure 10)
Figure #10: Z-index update
Note: even though the svg_green_stripe element is at the bottom of the tree, the fact that it’s Z-index is higher than any other element in the tree stacks it on top.
Z-indexing also works for elements that are children of containers as well as for containers themselves.
3. Open the con_svg_black container, select the svg_black_over element to make it active and set a Z-index of 40. If your preview window is still open you will see it automatically update and put the top part of the black ribbon above the green stripe. (Figure #11)
Figure #11: Z-index update for svg_black_over element
4. Select the svg_black_under element to make it active and set a Z-index of 20.
5. Open the con_svg_yellow container, select the svg_yellow_under element to make it active and set a Z-index of 10.
6. Select the svg_yellow_over element to make it active and set a Z-index of 50.
7. Select the con_text_links container to make it active and set a Z-index of 60.
Note: the preview now displays our elements stacked in the correct order (Figure #12)
Figure #12: Elements stacked based on their Z-index numbers
8. Save the Skin, and click on the ‘Generate Output’ button to see the updated project (Figure #13)
Figure #13: lower third showing correct stacking order
Animate the Lower Third Elements
Note: in this step we will animate the elements that make up the lower third banner. The elements will move from off screen lower right into position.
The animations will occur in a staggered overlap with the black ribbon animating on first, followed by the green stripe and the yellow banner.
The text will not animate but appear using different actions..
Open the skin if it’s not already open.
From the skin menu select View / Show Off-Canvas Elements (Figure #14)
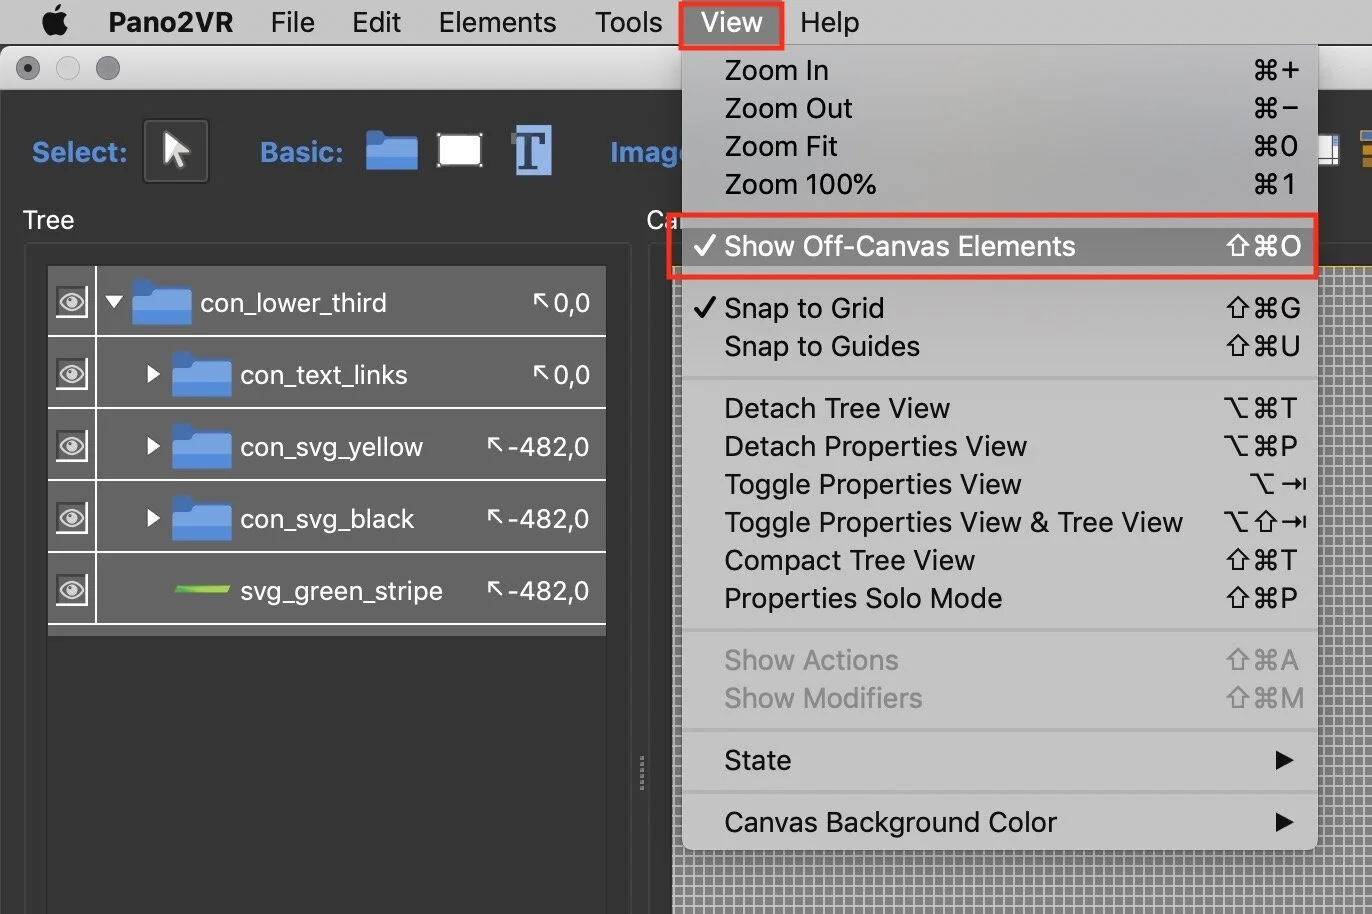
Figure #14: Show Off-Canvas Elements menu
Note: this will automatically extend the canvas to show elements that are outside of the set Canvas size
3. Shift select svg_green_stripe, con_svg_black and con_svg_yellow elements
4. Set the Properties / Position / X: to -482 (Figure #15)
Figure #15: Set element positions
5. Select: ‘Draw Timer’ and click once into the skin to add the timer.
6. With the Timer selected set the following properties;
Position / ID: timer_black
Timer / Timeout: 2.000 seconds
Actions / Source: Deactivate | Action: Position/Size | Type: Change Element Position | Offset: X: -482 | Transition Time: 2.000s | Target: svg_black_over (Figure #16)
Actions / Source: Deactivate | Action: Position/Size | Type: Change Element Position | Offset: X: -482 | Transition Time: 2.000s | Target: svg_black_under (Figure #16)
Figure #16: timer_black settings
7. Open the ‘Live Preview’ window. After 2 seconds the elements in the con_svg_black container animate onto the screen (Figure #17)

Figure #17: svg_black_over & svg_black_under animation
8. Repeat steps 5 & 6 with these Property settings;
Position / ID: timer_green
Timer / Timeout: 1.500 seconds
Actions / Source: Deactivate | Action: Position/Size | Type: Change Element Position | Offset: X: -482 | Transition Time: 2.000s | Target: svg_green_stripe
Note: Check the ‘Live Preview’ window. Now the green stripe appears within the black ribbon (Figure #18)
Figure #18: svg_green_stripe animation
9. Repeat steps 5 & 6 with these Property settings;
Position / ID: timer_yellow
Timer / Timeout: 1.000 seconds
Actions / Source: Deactivate | Action: Position/Size | Type: Change Element Position | Offset: X: -482 | Transition Time: 3.000s | Target: svg_yellow_over
Actions / Source: Deactivate | Action: Position/Size | Type: Change Element Position | Offset: X: -482 | Transition Time: 3.000s | Target: svg_yellow_under
Note: Check the ‘Live Preview’ window. Now the elements in the con_svg_yellow container animate onto the screen (Figure #19)
Figure #19: svg_yellow_over & svg_yellow_under animation
10. Select the txt_main element and set the following properties;
Properties / Appearance / Alpha: 0.000
11. Repeat steps 5 & 6 with these Property settings;
Position / ID: timer_text
Timer / Timeout: 4.000 seconds
Actions / Source: Deactivate | Action: Alpha | Type: Change Element Alpha | Alpha: 1.000 | Transition Time: 1.000s | Target: txt_main
Note: for the txt_title I want it to move down over the black ribbon but not appear until it’s over the ribbon. To do so I need to add a container that will mask the text.
!! Make sure you don’t have any elements selected by clicking outside of the canvas.
12. Click on ‘Draw Container’ and click once in the skin to add it to the skin
13. Set the following properties;
Position / ID: con_txt_title
Position / Position: / X: 330px | Y: 388px
Position / Anchor: top left
Position / Size: / Width: 290px | Height: 50px
Container / Masking: check Enabled
13. Drag the con_txt_title element into the con_text_links container and position it above the txt_tile element.
14 Drag the txt_title element into the con_txt_title container to make it a child of the container (Figure #20)
Figure #20: con_txt_title container with txt_tile element as a child
15. Select the txt_tile element and set the following properties:
Properties / Position: / to Y: 60px
Appearance / Alpha: 0.000 (Figure #21)

Figure #21: txt_tile element positioned outside of the con_txt_title container
16. Select the timer_text element and add 2 new Actions:
Actions / Source: Deactivate | Action: Alpha | Type: Change Element Alpha | Alpha: 1.000 | Transition Time: 1.000s | Target: txt_title
Actions / Source: Deactivate | Action: Position/Size | Type: Change Element Position | Offset: Y: 40 | Transition Time: 1.000s | Target: txt_title
Note: Check the ‘Live Preview’ window. Now the txt_title animates down into the black ribbon
17. Drag the txt_link element into the url_link element to make it a child of the element and set the following Properties:
Properties / Appearance /Alpha: 0.000 | Hand Cursor: checked
18. Select the url_link element and set the following Properties;
Properties / Actions /Source: Mouse Click | Action: Go to URL | URL: https://tonyredhead.com/tipsandtutorials| Target: _blank (Figure #22)
Figure #22: url_link settings
19. Repeat steps 5 & 6 with these Property settings;
Position / ID: timer_text_link
Timer / Timeout: 5 seconds
Actions / Source: Deactivate | Action: Alpha | Type: Change Element Alpha | Alpha: 1.000 | Transition Time: 1.000s | Target: txt_link
20. Save the skin
21. Republish the project
Note: we now have an animated Lower Third Banner, in Part 2 we will develop a break size to determine at what point we require the responsive logic to apply to the banner. Add logic to the Scale property of the lower third banner elements to change the banner under certain conditions and finally add a timer and logic to hide the Lower Third Banner when the panorama is being interacted with.
If you are ready head on to Part 2
Summary
I hope you have enjoyed the tutorial and it has helped you to achieve the best possible project outcome. If it has please take a second to consider a donation so that I can continue to add more tutorials.
