
Working on a Pano2VR project with a client in a remote location can be problematic when small changes need to be made to the project and approved, especially when multiple display devices are required.
I’m based in Australia, and I have clients in the United States. We meet regularly on Zoom to review the development process and discuss changes that must be made. On Zoom, I can share my desktop, and the client can see me make changes while using Live Update to refresh the project, but they cannot see it running on their local devices until I upload the project to my web server.
Pano2VR recently released a new beta version, Pano2VR 7.1. In a recent webinar, What’s New in Pano2VR 7.1, Martin Hopkins showed us how to use an application called ngrok. He demonstrated how remote locations can connect their local devices to your Pano2VR application running on your localhost via a URL and automatically update using Live Update.
In this tutorial, I’ll take you step-by-step through the process described by Martin in the video.
In it, I’ll cover the following topics;
Requirements
What does ngrok do?
Advantages of using ngrok
Limitations of Tunnel
Signing up to ngrok
Installing ngrok
Sharing a Project
Using a Rebrandly URL Shortener
I’d highly recommend watching the video first and this link will take you directly to the section on ngrok https://youtu.be/9faufDZuMLw?si=SOs5GGlKDorL7ZN8&t=1733
Requirements
This tutorial is designed for a Mac running Pano2VR 7.1 beta 1.
Note: The tutorial will work on Pano2VR V7.0.10, but the remote devices will not automatically update and need a browser refresh.
Testing devices can be Mac, Windows, iOS or Android. If you want to test mobile or VR Headset features, you must use https.
Note: Mobile features require the https protocol, which is currently only available in the beta version for this type of connection.
What does ngrok do?
ngrok is a software platform that provides secure tunnels from a public endpoint to a locally running network service like Pano2VR’s Integrated Web Server. (figure #1)
Figure #1: Pano2VR Integrated Web Server
It essentially creates a secure tunnel between the Integrated Web Server running on your machine and a publicly accessible endpoint on the ngrok server.
Advantages of using ngrok
ngrok provides a way to share and test your Pano2VR project running on localhost with remote team members or clients, allowing for instant feedback on changes made to the project.
Clients can see updates in real-time on their own devices, including Virtual Reality headsets, enabling rapid iteration and refinement of skin and project elements.
Limitations of Tunnel
While HTTP tunneling offers many benefits, it also has some limitations, and it is important to advise your clients of potential limitations before they engage the service:
Protocol Support: HTTP tunneling primarily works with HTTP and HTTPS traffic. It may not be suitable for protocols significantly different from HTTP, such as UDP or ICMP. While some HTTP tunneling solutions can handle other protocols, they may not offer the same level of performance or reliability.
Performance Overhead: Encapsulating non-HTTP traffic within HTTP packets can introduce additional overhead, including an increase in header size and potential latency. This overhead may affect the performance of the tunneled traffic, especially for high-volume or time-sensitive applications.
Firewall and Security Concerns: While HTTP tunneling can bypass certain firewall restrictions, it may also raise security concerns. Firewalls and security systems are designed to monitor and filter network traffic, and using HTTP tunneling can potentially circumvent these security measures, leading to security vulnerabilities or unauthorized access.
Dependency on External Services: Many HTTP tunneling solutions rely on external servers or services to establish and maintain the tunnels. This dependency means that the tunneling service's availability and reliability are contingent on the external service provider's availability and reliability.
Limited Control and Visibility: When using HTTP tunneling services, users may have limited control and visibility into the underlying tunneling process. This lack of control can make it challenging to diagnose and troubleshoot issues that may arise during tunneling.
Potential for Abuse: HTTP tunneling can be used for legitimate purposes but can also be abused for malicious activities, such as bypassing network security measures or hiding malicious traffic within HTTP packets. As a result, organizations may need to implement additional monitoring and security measures to mitigate these risks.
Getting Started
The sign-up and installation process is relatively straightforward, but the latter requires using the Terminal. In this tutorial, I will detail all the steps you need to take to share your project successfully.
Note: click on any image to enlarge it. If you want to use Multi-factor Authentication make sure you have a mobile device handy with an Authenticator App installed (in this tutorial I use the Google Authenticator)
Signing up to ngrok
1. Open the URL https://ngrok.com (figure #2)
Figure #2: ngrok.com website
2. Click on the Sign up button and fill in the Sign up form using either Email, GitHub or Google. (figure #3)
Figure #3: Sign Up form
3. If you use email a Verify Email notification will appear. Go to your email and click on the link. (figure #4 & 5)
Figure #4: Verify Email notice
Figure #5: Confirmation link
4. After verifying the email address, the ngrok website offers the option to set up Multi-factor Authentication. You can skip this step or setup the authentication using an app of your choice. I used the Google Authentication app on my iPhone 11 Pro.
5. Once you have the authentication code, click Next to open the Device Activation form (figure #6)
Figure #6: Multi-factor Authentication
6. Enter your code and click Continue. (figure #7)
Figure #7: Device Activation
7. On the Recovery Codes page, click either Copy to clipboard or Download to save the codes and then click the checkbox and Finish to continue (figure #8)
Figure #8: Recovery Codes
8. ngrok asks you for some information about yourself. Enter your answers and click Continue. (figure #9)
Figure #9: About
Installing ngrok
Note: When you have completed the Sign Up the welcome page is displayed. The next step is to download, install, and configure the software. (figure #10)
1. From the Welcome page under Agents, ensure that MacOS is selected. 2. Under Connect, select Download 3. Click on the appropriate platform architecture.
Note: I am working on an Apple Studio computer, so I’ve selected Apple—Silicon
3. Select a location to save the file.
Figure 10: The Welcome page
Note: I have selected the desktop as the location for the download. (figure #11)
Figure #11: ngrok download on the Mac Studio Desktop
Note: keep the Welcome page open in a browser as we will return to it to copy the terminal commands.
4. Open the Terminal Application (figure #12)
Figure #12: Terminal application and Zip file on Desktop
5. Hold down the Command key and drag the ngrok zip file into the Terminal window (figure #13)
Figure #13: drag zip into the terminal
Note: Dragging using the Command key will automatically change the directory location in the Terminal to the location of the zip file (figure #14)
Figure #14: location of the zip file
6. From the Welcome page copy the sudo unzip command and paste it into the Terminal. (figure #15)
Figure #15: sudo unzip command
7. Select return
8. Enter your password in the Password prompt (figure #16)
Figure #16: Password Prompt
9. Select return to extract the zip file's contents. (figure #17)

Figure #17: Extracting the application
10. From the Welcome page, copy the ngrok config command and paste it into the Terminal. (figure #18)
Figure #18: adding the ngrok config command
11. Select return to finish the installation. (figure #19)

Figure #19: Finishing the installation
Sharing a Project
1. Open your Pano2VR project (figure #20)
Figure #20: Pano2VR project
2. Launch the Integrated Web Server.
3. Enable Live Update
4. Output the Project (figure #21)
Figure #21: Integrated Web Server, Live Update and Output
Note: Pano2VR includes a local web server built in to the software. It simulates an active web server so you can view your project locally (browsers restrict local viewing for security reasons).
When your Web Output is generated, the project’s HTML file will open in your computer’s (local host) default web browser.
In the image below, we can see the files being delivered to the browser via the web server. (figure #22)
Figure #22: Integrated Web Server
Note: The web server has two Addresses, http and https.
In simple terms, HTTP is like sending a message on a postcard. It's easy to read because it's not protected.
HTTPS is like sending a message in a locked box. It's secure because it's protected from anyone who might try to peek at it while it's being sent.
Unfortunately the current version of Pano2VR https does not work with ngrok but the new beta version does. Both iOS and Android, features like the gyroscope and VR require https. If you don’t need to show the https features then using the current version and http is fine.
On the end of each http/s url is a 4 letter number, this is a port number and can be set to a specfic port in the Pano2VR Preferences. (figure #23)
Figure #23: Setting fixed port numbers in Preferences
Note: The published output using the localhost:8000 url (figure #24)

Figure #24: localhost:8000 url
5. Open the Terminal if it’s not already open (figure #25)
Figure #25: Terminal
7. In the Integrated Web Server right click on the http link and select Copy Link Location (figure #26)
Figure #26: Copy the Link Location
8. In the Terminal, after the prompt enter ngrok http (figure #27)
Figure #27: ngrok entry
9. Then paste in the copied link
Note: you need to have two http’s in the entry (figure #28)
Figure #28: ngrok entry and web server link
10. Select return and the Terminal changes to reflect the ngrok interface (figure #29)
Figure #29: ngrok interface showing Session Status:
11. Copy the first part of the Forwarding line.
Note: this is the link that you will provide to the remote locations that you want to share your project with. (figure #30)
Figure #30: copy the Forwarding line:
Note: you can now share this link in a number of ways, including email or messages.
In this example I’m going to use my iPhone 15, you also use a browser on your desktop to test the functionality.
12. Open a browser on your mobile device or desktop
13. Paste or enter the forwarding link copied from the terminal into the browser’s address bar and select enter.
Note: this opens an information page with link. (figure #31)
14. Click the Visit Site button (figure #32)
15. On the Integrated Web Server page click the Output link (figure #33)
Figure #31: Information page with link
Figure #32: Integrated Web Server page
16. Click the index.html link to launch the project (figure #)
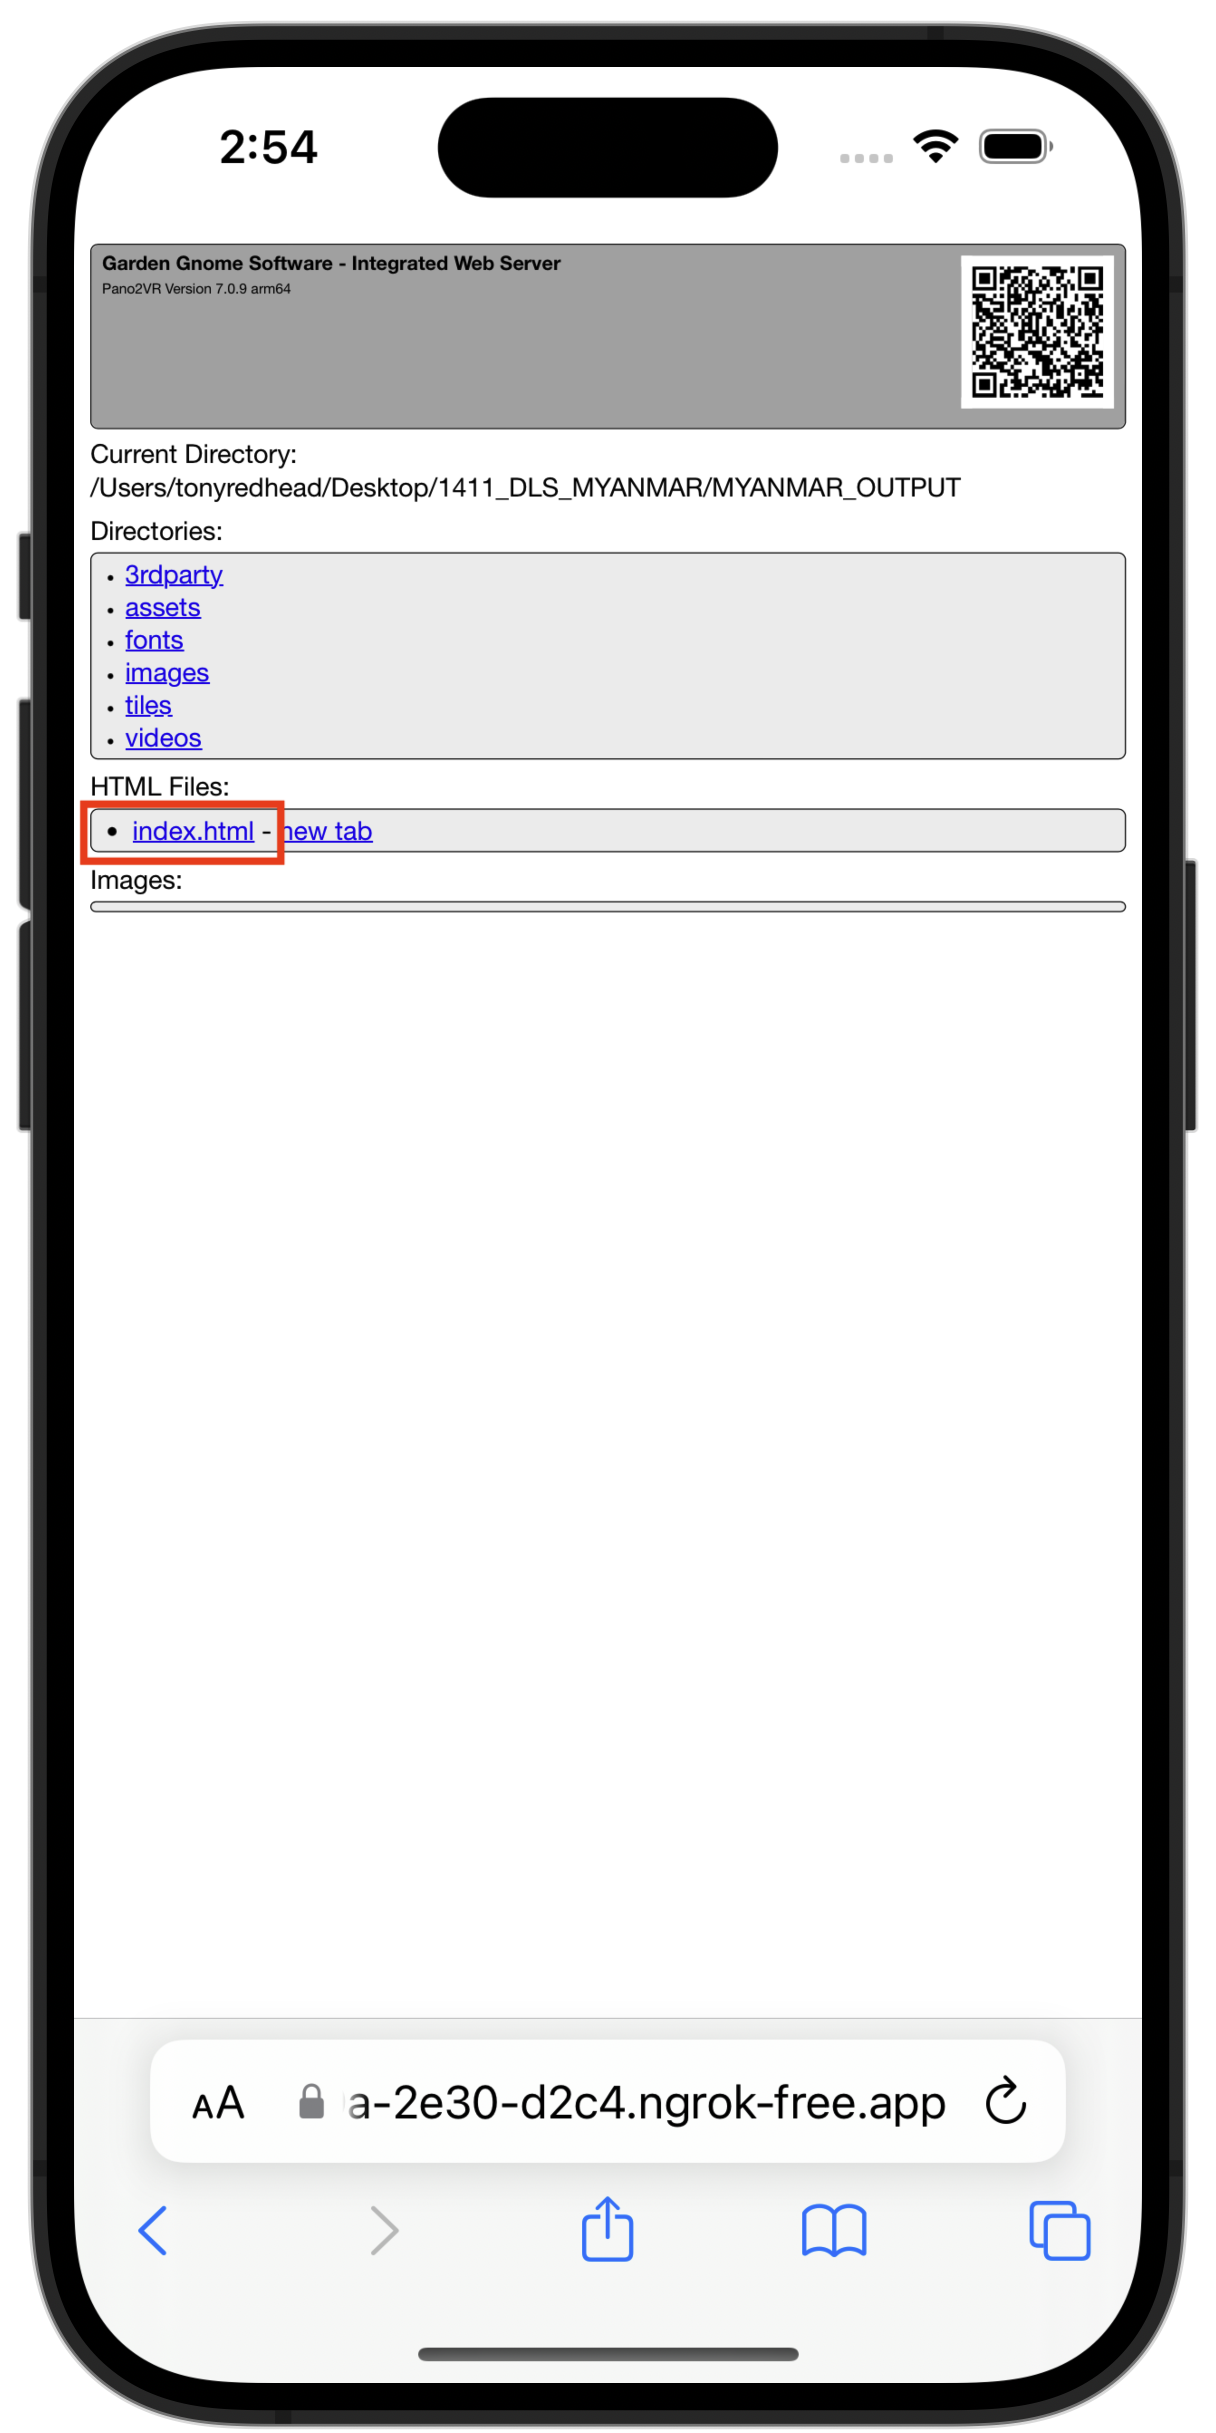
Figure #33: Index.html link
Figure #34: Project opened in Safari on iPhone 16 Pro
Note: now that the remote location has access to the localhost version any changes I make locally, using Live Update, will be reflected on the remote locations device.
As an example I will change the Aung Sun Suu Kyi quote on the homepage, “The only real prison is fear, and the only real freedom is freedom from fear” (figure #) to another of her quotes, “It’s not power that corrupts but fear” and save the project. (figure #35 & 36)
Figure #35: Original Splash Description

Figure #36: Updated Splash Description
Note: The project on the remote location device has been updated and reflects the new Splash Description (figure #37)

Figure #37: Updated Splash Description
Note: We have created our account, set up our software, generated our ngrok tunnel URL and our remote location can view any changes we make on their own devices in real time.
Using a URL Shortener
Note: the URL generated by ngrok is quite long and changes everytime we restart the terminal. By using a URL Shortener program we can create a better user experience with a more memorable URL.
A URL shortener is like a mini version of a regular web address. It takes a long web address and creates a shorter version that redirects to the original. It's handy for sharing links on social media or in messages where character count is limited. So instead of pasting a long URL, you can use a shorter one that leads to the same place.I use an application called Rebrandly (Figure #38)
Figure #38: Rebrand.ly homepage
Rebrandly allows me to create a link e.g. tonyredhead.link/liveupdate that points to the ngrok forwarding link .
The application also allows me to update the rebrandly link tonyredhead.link/liveupdate with the latest ngrok output URL.
This lets me give my client the tonyredhead.link/liveupdate link and simply update the forward link.
2. Open the current rebrandly link tonyredhead.link/liveupdate and click on the edit button (Figure #39)
Figure #39: Current Rebrandly link
2. Click on the current link (Figure #40)
Figure #40: Link Editor
3. Select the current link and delete it (Figure #41)
Figure #41: Removing the old Forward URL
4. Paste in the new forward URL and save (Figure #42)

Figure #42: Active Forward URL
Note: In the examples of Rebrandly I am using a free trial of the Essentials Plan that costs $13 a month. The main difference between the Essentials and Free plan is that I can keep the same Rebrandly link while changing the location it points to and I can use a custom domain.
No credit card is needed for the free plan but if you want to trial the Essentials Plan you need a credit card. If you don’t want to continue just make sure to cancel before the trial ends.
Donations
I hope you have enjoyed the tutorial and it has helped you to achieve the best possible project outcome. If it has please take a second to consider a donation so that I can continue to add more tutorials.
